
Back
Round Shield Construction
Shield Construction
Step by step method for the construction of a traditional round shield for use
in sword-and-shield fighting.
Materials
- 5/8" plywood--at least a 2'x2' section
- nail and hammer
- line or string--non-strechy. Fishing line may be best
- pencil
- scroll saw
- Carpenter's square
- drill
- strapping--canvas or leather
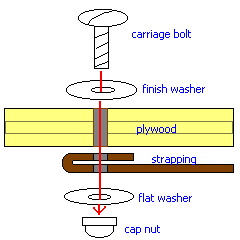
- 6 bolts--1" oval-head machine screws about 10/24"
- 6 finish washers
- 6 flat washers
- 6 cap nuts to fit
- hole punch (if using leather straps)
Cutting out the Shield Face
- Drive the nail into the plywood board about 13" from two edges. Tie the line
to the nail
- Tie the pencil to the line at a distance away from the string so that the tip
just touches the nearest edge. Being careful to hold the pencil straight up and
down, keep the line taught, and trace a circle on the board. If your line can
stretch even a little bit, be careful to maintain even pressure on the line
- Untie the line, set the scroll saw against the edge of the board where the
circle just touches. Pull the line taut, and, keeping it very taught, tie it to
the base of the saw.
- Run the saw around the circle. The line will guide it, but if it can stretch even a
little bit, you will need to carefully guide it to stay on track. Be careful to
support the disk as you cut it free.
- Remove the nail. If desired, you may touch up your circle with a plane or file.
Preparing shield for hardware

- Lay the carpenter's square across the disk, and draw a line that passes through
the nail hole. This will be your horizontal line, all fixtures will be laid out
to either side of this line.
- Lay the carpenter's square on your horizontal line, and draw a line perpendicular
to it that passes through the nail hole. Extend the line to both sides of the
horizontal line
- Measure 2-3/4" along the vertical line to either side of the horizontal line.
- Drill a hole at each spot using a bit large enough to allow the passage of the
bolts. This is where your first handgrip will go.
- Measure on the horizontal line 3" to the right of the nail hole. Draw a new
vertical line here.
- Measure 2-3/4" to either side on this new line, and drill holes there with the same
drill bit. This is where your second handgrip will go.
- Measure on the horizontal line 7-3/4" to the left of the nail hole. Draw a new
vertical line here.
- Measure 5-1/8" to either side on this new line, and drill holes there with the same
drill bit. This is where the arm strap will go.
Adding hardware
Use the finish washers on
the front surface of the shield, so that surface has no projecting bolt heads and allows
blows to glance off easily. Using cap nuts on the opposite side means there are no
sharp edges that could be forced into you.
- Cut the strapping into three lengths, two 10-1/2" long, and one 16" long. (if you have
exceptionally large arms, you may wish to allow extra length
- For leather straps, punch a hole at one each end. For canvas straps, fold the first 3/4"
of the strap over and poke a hole through both layers at each end.
- Attached the straps using a bolt passed through a finish washer, then through the shield,
both layers of strapping, the flat washer, and the cap nut. Tighten finger-tight.
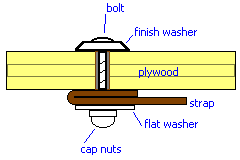
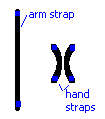
- Angle the grip straps toward each other at a 30 degree angle, so that they are shaped
like the sides of an hourglass as in the diagram at right. Tighten all bolts with
a screwdriver and wrench.
- Wearing shirt or arm-covering typical to fighting, put your arm through the
arm strap and grip the hand straps tightly. If anything is too loose or tight, disassemble
one bolt, make a new hole, and reassemble. The tension of grabbing the two handgrips
together is what should make the grip firm. If the straps pull together easily, tighten
them. A shield that will wobble on a blow is a poor shield.
Accessories
For comfort, you may wish to glue a piece of felt behind your arm, and especially
your knuckles
This shield lacks a metal rim. This is a period authentic way of making a shield,
it will remain durable under a lot of combat abuse. Indeed, some suggest that a
rimless shield has an advantage, as a weapon can get caught in the edge more easily,
momentarily incapacitating your opponent. A metal rim can be added, of course, as well
as a boss, but that is beyond the scope of this project.
The surface of the shield can of course be improved. Shields were often covered with
leather, and this can easily be done by cutting a 27 & 1/2" circle in the leather, and carefully
folding and tacking it around the edge. For decoration and reinforcement, brass
or steel studs can be driven into the surface. And of course it can be painted. Knock
yourself out.
Any questions with this procedure, please ask The Numenorean.